

How To Upload A Bin To Esp32
How to upload a compiled ESP32 sketch from command line to devices using esptool (Windows/Mac)
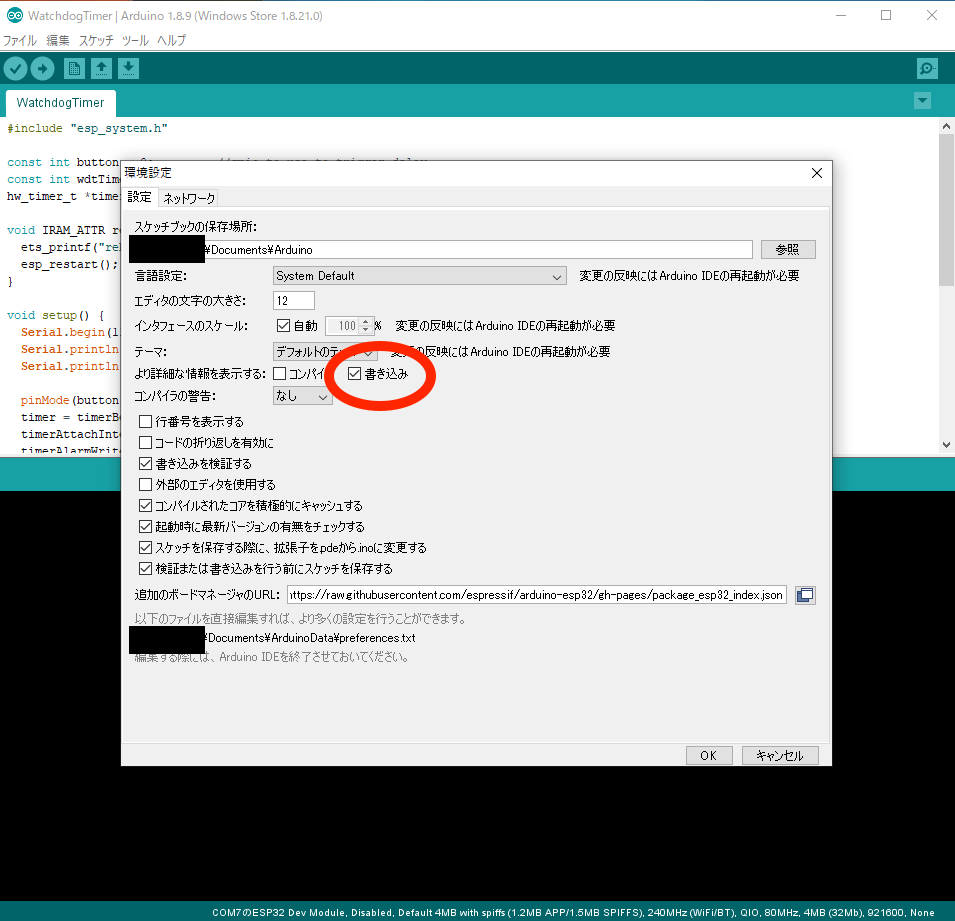
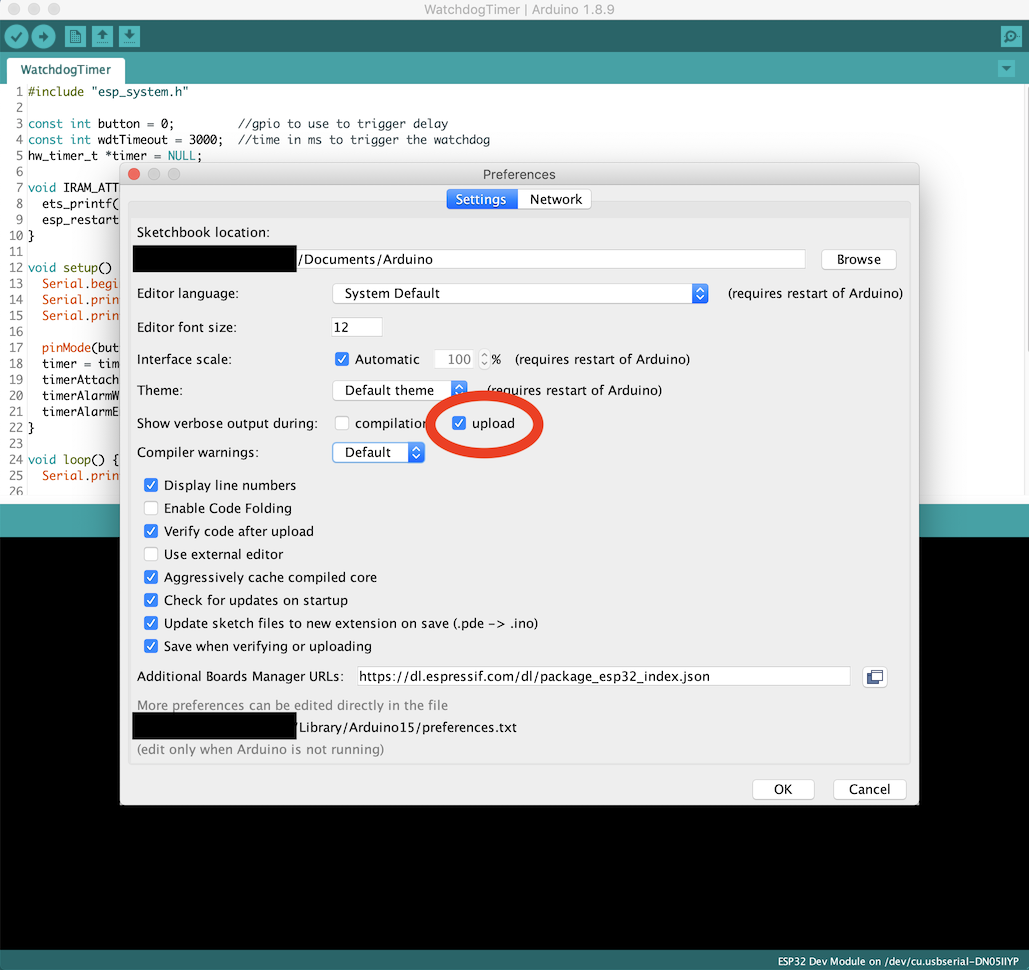
(この記事には日本語版があります) I am using the Arduino IDE for developing ESP32 and uploading my sketch. Arduino IDE always executes compilation before uploading sketches to devices. This is then abrasive when I have to upload my sketch with the same contents to dozens of boards. So I thought information technology's good that I keep a compiled binary then use it repeatedly for uploading. In this article, I will explicate how I did that. Consummate setting up the Arduino IDE and ESP32 SDK. It means you should be able to compile ESP32 sketches and write them to actual devices. Details of training are non covered in this article. Launch Arduino IDE and open the sketch y'all want to employ. Open up the preferences window, check "Show verbose output during: upload". click the OK push button and close the window. Connect an ESP32 board to PC or Mac and so compile and upload your sketch one time. The detailed information will be displayed at the output surface area of the Arduino IDE'due south editor window. Find the line that is running the There are two places in the command line where the path of the file with the extension For example, when the ESP32 WatchdogTimer sample was compiled and uploaded, the following two If you are using Mac, open Final.app or similar, or if you lot are using Windows, open cmd.exe and navigate to the folder/directory where yous saved the .bin files. Open the text file you saved the esptool control line, change the path of Depending on the ESP32 board, the serial port number may change if you lot connect a physically different board to your PC/Mac. When uploading firmware from a command line, information technology is necessary to specify the serial port number of the board currently continued to your PC with the How to write a compiled ESP32 firmware image from the control line using the Environment
Preparations
Procedure
Step 1.
Step 2.
Windows
Mac
Stride 3.
Step 4.
esptool control in the output surface area. Copy the line entirely and relieve it in a text file to use after.Footstep 5.
.bin that contains the proper name of your sketch is specified in the argument of theesptool command. Copy the two .bin files and store them somewhere..bin files that incorporate the sketch proper name(WatchdogTimer) were obtained.
Afterwards compiling & uploading(Windows)
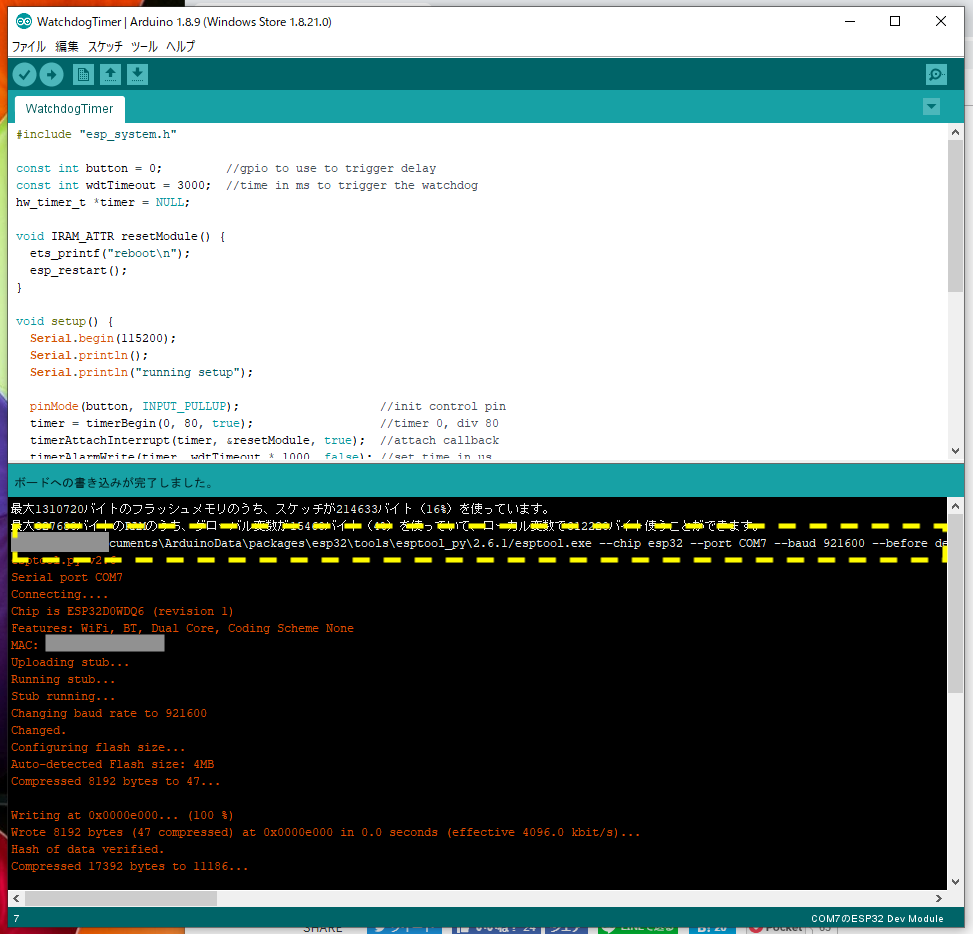
C:\Users\hogehoge\Documents\ArduinoData\packages\esp32\tools\esptool_py\2.6.1/esptool.exe --scrap esp32 --port COM7 --baud 921600 --before default_reset --subsequently hard_reset write_flash -z --flash_mode dio --flash_freq 80m --flash_size discover 0xe000 C:\Users\hogehoge\Documents\ArduinoData\packages\esp32\hardware\esp32\1.0.4/tools/partitions/boot_app0.bin 0x1000 C:\Users\hogehoge\Documents\ArduinoData\packages\esp32\hardware\esp32\1.0.4/tools/sdk/bin/bootloader_qio_80m.bin 0x10000 C:\Users\hogehoge\AppData\Local\Temp\arduino_build_425707/WatchdogTimer.ino.bin 0x8000 C:\Users\hogehoge\AppData\Local\Temp\arduino_build_425707/WatchdogTimer.ino.partitions.bin esptool.py v2.6 After compiling & uploading(Mac)
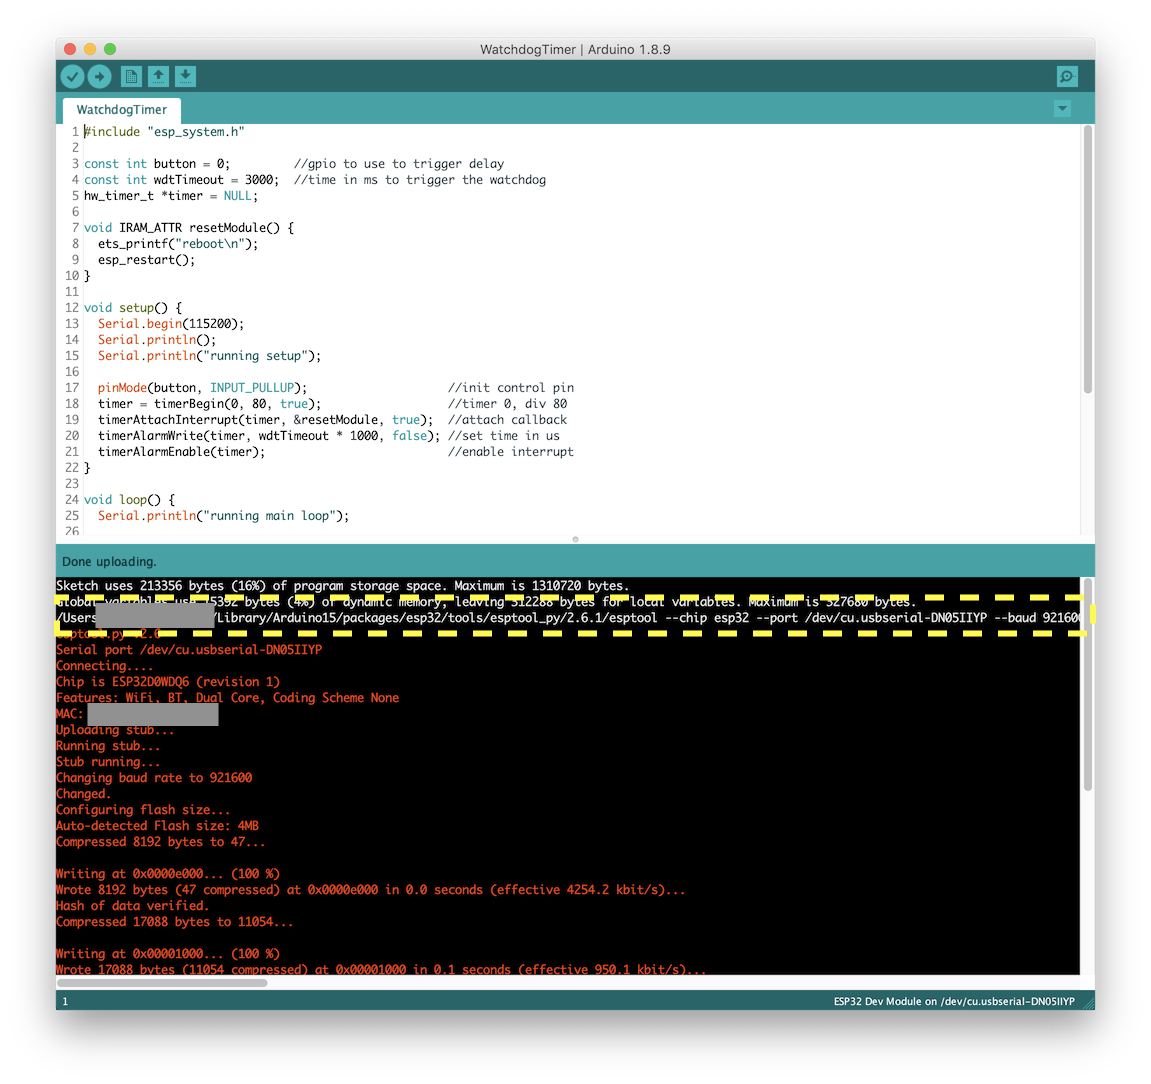
/Users/hogehoge/Library/Arduino15/packages/esp32/tools/esptool_py/2.six.one/esptool --scrap esp32 --port /dev/cu.usbserial-XXXXXXXX --baud 921600 --earlier default_reset --after hard_reset write_flash -z --flash_mode dio --flash_freq 80m --flash_size detect 0xe000 /Users/hogehoge/Library/Arduino15/packages/esp32/hardware/esp32/1.0.iii/tools/partitions/boot_app0.bin 0x1000 /Users/hogehoge/Library/Arduino15/packages/esp32/hardware/esp32/1.0.3/tools/sdk/bin/bootloader_qio_80m.bin 0x10000 /var/folders/8q/zz5yryg10bs8h6n8rktc_mtw0000gq/T/arduino_build_834564/WatchdogTimer.ino.bin 0x8000 /var/folders/8q/zz5yryg10bs8h6n8rktc_mtw0000gq/T/arduino_build_834564/WatchdogTimer.ino.partitions.bin Terminal Footstep
<your sketch name>.ino.bin and <your sketch name>.ino.partitions.bin. Copy the command line and paste it to the Last.app or cmd.exe. And hit the enter fundamental. This will start uploading the compiled firmware to an ESP32 device.Effect of uploading(Windows)
F:\tmp>C:\Users\hogehoge\Documents\ArduinoData\packages\esp32\tools\esptool_py\2.6.1/esptool.exe --bit esp32 --port COM7 --baud 921600 --earlier default_reset --after hard_reset write_flash -z --flash_mode dio --flash_freq 80m --flash_size detect 0xe000 C:\Users\hogehoge\Documents\ArduinoData\packages\esp32\hardware\esp32\ane.0.four/tools/partitions/boot_app0.bin 0x1000 C:\Users\hogehoge\Documents\ArduinoData\packages\esp32\hardware\esp32\1.0.4/tools/sdk/bin/bootloader_qio_80m.bin 0x10000 .\WatchdogTimer.ino.bin 0x8000 .\WatchdogTimer.ino.partitions.bin esptool.py v2.6 Serial port COM7 Connecting.... Scrap is ESP32D0WDQ6 (revision ane) Features: WiFi, BT, Dual Core, Coding Scheme None MAC: XX:20:XX:XX:Xx:20 Uploading stub... ~ ~ ~ snip ~ ~ ~ Hash of data verified. Compressed 3072 bytes to 128... Wrote 3072 bytes (128 compressed) at 0x00008000 in 0.0 seconds (effective 1638.4 kbit/s)... Hash of data verified. Leaving... Hard resetting via RTS pin... F:\tmp> Result of uploading(Mac)
$ /Users/hogehoge/Library/Arduino15/packages/esp32/tools/esptool_py/2.6.i/esptool --chip esp32 --port /dev/cu.usbserial-XXXXXXXX --baud 921600 --before default_reset --later hard_reset write_flash -z --flash_mode dio --flash_freq 80m --flash_size detect 0xe000 /Users/hogehoge/Library/Arduino15/packages/esp32/hardware/esp32/1.0.3/tools/partitions/boot_app0.bin 0x1000 /Users/hogehoge/Library/Arduino15/packages/esp32/hardware/esp32/i.0.3/tools/sdk/bin/bootloader_qio_80m.bin 0x10000 ./WatchdogTimer.ino.bin 0x8000 ./WatchdogTimer.ino.partitions.bin esptool.py v2.6 Series port /dev/cu.usbserial-XXXXXXXX Connecting.... Chip is ESP32D0WDQ6 (revision i) Features: WiFi, BT, Dual Cadre, Coding Scheme None MAC: Twenty:XX:20:XX:XX:XX Uploading stub... ~ ~ ~ snip ~ ~ ~ Hash of data verified. Compressed 3072 bytes to 128... Wrote 3072 bytes (128 compressed) at 0x00008000 in 0.0 seconds (constructive 1528.7 kbit/southward)... Hash of data verified. Leaving... Hard resetting via RTS pin... $ Additional notes
.bin file is created in the aforementioned location as your sketch. the contents of this .bin file is as same as the <your sketch proper noun>.ino.bin. --port option.Conclusion
esptool command has been explained. You can reduce abrasive GUI operations and salve your time a little chip by using this method. If y'all know a smarter way, I'd honey to hear from you!References

Source: https://dev.classmethod.jp/articles/esp32-upload-compiled-sketch-using-esptool-en/
Posted by: munzwhishill.blogspot.com
0 Response to "How To Upload A Bin To Esp32"
Post a Comment