

Harden Windows Defender protection to the highest levels on Windows 10
Microsoft appear a new Windows Defender Security Center starting from the Windows 10 v1703 and this makes it easier to toggle the security settings for our PCs. Past default, Windows Defender is set in a low protection style since this volition make our lives like shooting fish in a barrel past imposing fewer restrictions, but IT administrators can enable Cloud Protection and change these Group Policy settings – Configure Block at First Sight, Configure local setting override for reporting, and Join Microsoft MAPS (Microsoft Advanced Protection Service) or SpyNet, to set Windows Defender Antivirus blocking protection to highest levels.
Harden Windows Defender protection in Windows 10
Run gpedit.msc to open up the Group Policy Editor and navigate to the following path:
Computer Configuration > Authoritative Templates > Windows Components > Windows Defender Antivirus > Maps
Here you will see 4 settings:
- Bring together Microsoft Maps
- Configure Block at Get-go Sight feature
- Configure local setting override for reporting to Microsoft MAPS
- Ship file samples when further assay is required.
You can configure Windows Defender settings according to your requirements.
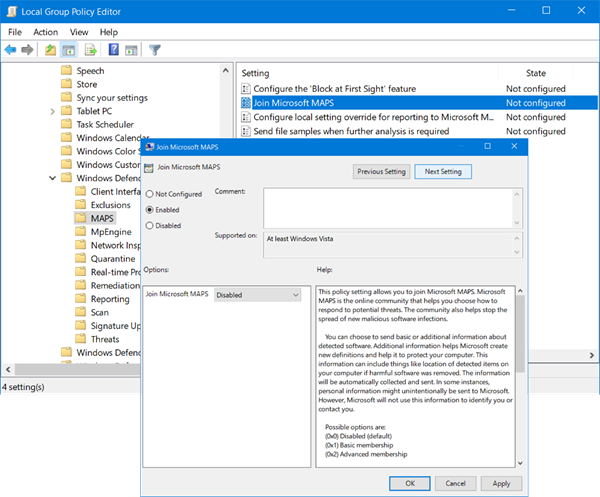
1] Join Microsoft Maps
To bring together Microsoft Advanced Protection Service , double-click on Join Microsoft Maps. In the Properties box which opens, select "Enabled."
This policy setting allows you to join Microsoft MAPS. Microsoft MAPS is the online customs that helps yous choose how to answer to potential threats. The community too helps stop the spread of new malicious software infections. Yous can choose to send basic or additional information about detected software. Boosted data helps Microsoft create new definitions and aid it to protect your reckoner. This information can include things similar location of detected items on your computer if harmful software was removed. The information volition be automatically collected and sent. In some instances, personal information might unintentionally be sent to Microsoft. Yet, Microsoft volition not use this information to place you or contact you.
You take iii options hither – Disabled, Basic membership and Advanced membership.
2] Configure Block at Showtime Sight feature
After joining MAPS, you tin can double-click 0n Block at First Sight and select Enabled in its Properties box..
This feature ensures the device checks in existent time with the Microsoft Agile Protection Service (MAPS) before allowing sure content to be run or accessed. If this feature is disabled, the bank check volition not occur, which will lower the protection land of the device.
This characteristic requires these Group Policy settings to be ready as follows: Bring together Microsoft MAPS must be enabled, the Send file samples when further assay is required should be set up to Send safe samples or Send all samples, the Scan all downloaded files and attachments policy must be enabled and the Turn off real-time protection policy should Non be enabled.
iii] Configure local setting override for reporting to Microsoft MAPS
The Configure local setting override for reporting to Microsoft MAPS setting will let users take precedence over the Group Policy thus somewhen allowing them to override the aforementioned.
This policy setting configures a local override for the configuration to join Microsoft MAPS. This setting can only be set past Group Policy. If you enable this setting, the local preference setting will take priority over Grouping Policy.
Y'all need to double-click on information technology and select Enabled in the Properties box which opens. Once this feature is enabled information technology will run checks in real-time and will determine on whether to allow the content to run or not.
iv] Send file samples when further analysis is required
The Send file samples when farther analysis is required setting will let you send all the samples automatically to Microsoft for further analysis.
This policy setting configures behaviour of samples submission when opt-in for MAPS telemetry is set. The possible options are: Always prompt, Send safe samples automatically, Never send and Send all samples automatically.
You lot need to double-click on it and select Enabled in the Properties box which opens.
Having done this, you can move on to set the Deject protection level for Windows Defender.
5] Select Deject Protection level in Windows Defender

The cloud protection level too can exist enabled past using the Grouping Policy by visiting the following path:
Computer Configuration > Administrative Templates > Windows Components > Windows Defender Antivirus > MpEngine
In the correct pane, you volition run across Select protection level. Double-click on it to open up its Properties box and then cull Enabled. You will see two options offered:
- Default Windows Defender Antivirus blocking level
- Loftier blocking level
Select High blocking level and click on Apply.
This policy setting determines how aggressive Windows Defender Antivirus volition be in blocking and scanning suspicious files. If this setting is on, Windows Defender Antivirus will be more than aggressive when identifying suspicious files to cake and scan; otherwise, information technology will exist less aggressive and therefore cake and scan with less frequency.
Read: How to enable and configure Ransomware Protection in Windows Defender.
vi] Configure extended cloud check
Under the MpEngine settings, you will also see aConfigure extended deject check setting. If you wish, y'all may also Enable this setting
This feature allows Windows Defender Antivirus to block a suspicious file for up to threescore seconds, and browse information technology in the cloud to brand certain it'south safe. The typical cloud cheque timeout is 10 seconds. To enable the extended cloud check feature, specify the extended fourth dimension in seconds, up to an additional l seconds.
TIP: Make Windows Defender protect you against Potentially Unwanted Programs too.
7] Enable & set Cloud Protection level to High using Registry
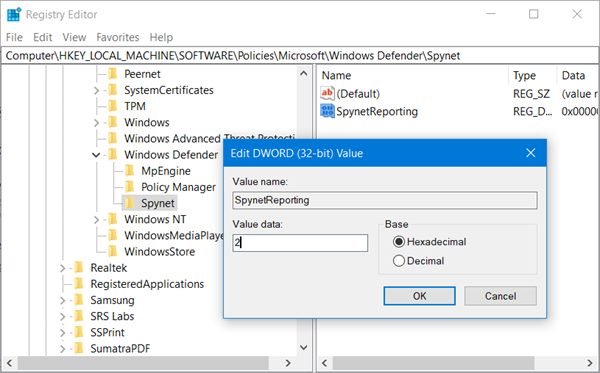
If you lot are a user of Windows 10 Habitation, then you lot can use the Windows Registry and tweak some settings. To do this, type regedit.exe in Kickoff Search and hit Enter to open the Registry Editor. At present navigate to the following key:
HKEY_LOCAL_Machine\Software\Policies\Microsoft\Windows Defender
In the left side, right-click on Windows Defender, select New > Cardinal and name the key Spynet. Right-click on Spynet and again select New > Dword (32-bit) and name it SpynetReporting. Set its value to two to set it at Advanced level.
Now, once again right-click on the Windows Defender key which appears on the left side and select New > Fundamental. This time proper name the primal equally MpEngine. Adjacent right-click on the MpEngine key and select New > Dword (32-bit) value. Proper noun the key as MpCloudBlockLevel and give it a value of two to ready it at High block level.
Tools that may help you:
- ConfigureDefender helps you modify Windows Security settings instantly
- WinDefThreatsView tool lets you set default actions for Windows Defender threats.

Source: https://www.thewindowsclub.com/harden-windows-defender-highest-levels-windows-10
Posted by: munzwhishill.blogspot.com
0 Response to "Harden Windows Defender protection to the highest levels on Windows 10"
Post a Comment